Tips for everything

.

Tuesday 18 May 2010

Meet The New Hotmail: Sleeker & Faster, With Some Powerful Weapons Against Inbox Overload

0 comments
Back in the days before Gmail, webmail on the Internet was really, really bad. Inboxes were limited to 10 or 20 megabytes, interfaces were slow and ugly, and the experience simply didn’t come close to matching what most desktop clients offered. This is how I remember Hotmail. I hated it. In fact, since signing up for Gmail in 2004, the only times I’ve checked out Microsoft’s webmail client were immediately after big launches, at which point I would reactivate my account, give it a quick run through, and promptly decide that it still wasn’t very good. So when I say that the new version of Hotmail that’s launching this summer has me excited, that’s saying something.
This morning, Microsoft showcased this new version of Hotmail to a room full of press at its offices in San Francisco. It’s fast, slick, and comes with a set of new features for managing large amounts of email that make it a much better rival to Gmail. Does it look like a revolution? Not really. But it does incorporate some very nice features — things that seem quite obvious once you seem them in action, but aren’t already available elsewhere. And more importantly, they’re features that regular people will actually use.
First, the stuff that Hotmail is really just playing catchup with. The first thing you’ll notice is that threaded conversations are now offered, and it looks like they’re the default (though you can turn them off). The search box now features auto complete. You can flag messages (I can’t believe this wasn’t available before). There’s better spam protection. Gmail users should stop yawning, because there’s plenty of other good stuff.
Perhaps the most important suite of features, at least to people who commonly experience inbox overload, are all the new filtering and message management tools the new Hotmail comes with. My favorite is called ‘Sweep’. If you’ve subscribed to a newsletter but decide you don’t want to filling up your inbox any more, you can hit activate this option to move every message you receive from that sender to a folder other than your mail inbox. Other webmail clients can do this too, but the flow for this looks easier than, say, making a filter in Gmail.
Another feature, called Hotmail Highlights, breaks out your messages according to where they’re coming from. One section shows you at a glance whether you’ve received any messages from people in your address book. Another shows you any messages you have from social networks like Facebook. On the left hand side of the screen, you’ll see a few options under the label “Quick View”. One of these is for photos — click it, and you’ll see all the messages in your inbox that have either image attachments or links to photo albums on sites like Flickr. There’s a similar option for Documents, as well as one that lets you immediately find shipping updates.
The other big features involve reading and composing messages. When you receive a message that has either photo attachments or links to an online photo album, Hotmail will use those photos to build a slick slideshow (it uses Silverlight). The service is even better for sending photos. Most email services aren’t great for sending photos, because they have a limit of 10-20 megabytes per message (and you also have to worry about whether the recipient’s service will allow for messages that large). Hotmail works around this by automatically uploading your images to Microsoft’s cloud storage service SkyDrive, which is free up to 25 GB. The resulting message looks great — Hotmail builds a photo album that should be visible in any mail client that supports rich formatting, and it doesn’t kill anyone’s inbox storage.

Finally there’s Hotmail’s integration with Microsoft’s online version of Office. When you receive a document in Hotmail, you have the option to view and edit it using the online versions of Office, and then save and send any changes back to the original sender. These online apps have strong integration with the desktop versions of Office 2010, but you don’t need the desktop apps in order to use the online versions for free. This is of course Microsoft’s answer to Google Docs, which is itself integrated into Gmail, and it looks well done (I expect document fidelity will be better for Microsoft, which may be a big sticking point).
I should point out that Yahoo Mail offers some of these features already (like the ability to break out messages that were sent by your contacts). And while Gmail doesn’t offer some of these features as part of its default set, you can reproduce some of them using filters. Hotmail doesn’t necessarily need to outdo its competitors in every respect — it’s still the largest email provider worldwide, with 360 million active accounts. But Gmail is growing fastest, and Microsoft is looking to curb that growth.  This new launch probably  isn’t going to spark any kind of mass migration away from Google’s services, it may well draw a few more former AOL users who are now looking for a new webmail provider.
Microsoft expects to ship the new Hotmail in mid-summer.
Read full story

Saturday 8 May 2010

Make Microblog on Joomla

0 comments
Microblog on joomla? Why not .. they only need a cup of coffee and an appropriate component. After I searched and searched I finally found a component called idoblog, You can download it for free here.. IDoBlog according to my own is an additional feature of the component "Community Builder"So for the perfect menginsatallnya you must enable"Fashion legacy"On Joomla 1.5
You can also mengintregasikan Community builder with IDoBlog because it will be more interesting for you who have developed web.

Jump aja follow a few steps from me:
  1. Administrator login to your joomla website
 

  1. Click Menu "Extension > Install / uninstall > Upload Package File"And browes idoblog file that you downloaded earlier been


  1. Wait until the installation process successfully
  2. The next step is to do some settings on the component
  3. click "Component > IDoBlog > global configuration 


  1. Please set a few configuration according to your tastes, this time I'll let the component settings TSB "default"


  1. Make a few additional menu IDoBlog, how clicks "Menus > Main Menu > News "To look like this


  1. to the page titled "blog" feature you select "Write to Blog"
  2. to the page titled "blog list" of features you select "View all blogs"
  3. to the page titled "my blog list" of features you select "View your blog", you can make your next .. all according to your tastes.

11. This is the page  "Blog" (our media in creating a blog) that was created earlier

Page "Blog List" would contain an entire list of blogs that have been made


The page "My Blog List" is a list of blogs that you write yourself

12. IDoBlog has been successfully added to your website joomla you ..
Read full story

Wednesday 5 May 2010

Thermalright Venomous X CPU cooler

0 comments
Thermalright is one of the top cooler manufactures, and for many years they sat as king of the hill with the Ultra 120 (or TRUE as some call it) and its many revisions. In the last couple of years that status has been challenged by companies like Noctua with the NH-U12P, and more recently the NH-D14. To get back on the top of the hill Thermalright has updated the Ultra 120 design and has called it the Venomous X.
We recently tested the Noctua NH-D14 and were very curious to see how the new Venomous X compared. So we contacted out friends at Crazy PC and they were nice enough to send us over a retail Venomous X. Let's get started by looking over the specifications and features of the Venomous X.
Features
  • All new patented multiple support pressure vault bracket system allows users to add pressure to the bracket system (40~70 lbs.) and have a more efficient and secure mounting (1366 / 1156 / 775).
  • Mirrored copper base increasingly upgrades the quality and the performance of the heatsink.
  • Special bent winglet design allows hot air to pass the heatsink more rapidly.
  • Heatsinks are all nickel plated to ensure the best quality and performance and could last for years.
  • Soldered heatpipes and copper base and fins to ensure the best thermal conducting efficiency.
  • Six sintered heatpipe design: all heatpipes are nickel plated to slow the oxidation deterioration to the heatpipe and to ensure longer usage and performance of the heatsink for the cpu.
  • Includes 2 sets of 120 x 25mm fan clips and Chill factor II thermal paste.
  • Convex copper base design to ensure the highest thermal conducting thermal efficiency between the cpu and the heatsink.
Specifications
  • Heatsink Dimension: Length 127mm x Width 63mm x Height 160mm
  • Weight: 755 g (excluding fan and bracket system)
  • Heatpipe: 6mm sintered heatpipe x 6 units
  • Copper base: C1100 pure nickel plated copper base, with ultra-shine mirrored surface.
Packing 


The Venomous X comes in a nice classy looking and very sturdy box. 
 
Inside we can see the cooler is cradled nicely in a high density foam under a small accessories box.
Read full story

Saturday 1 May 2010

DUE TO IMPROVING COMPUTER VIRUS TIPS

0 comments
This time it will discuss how to fix the broken windows either system caused by malware, viruses and the like or for other reasons with the Program System Repair Engineer (SREng).

System Repair Engineer (SREng)

System Repair Engineer (SREng) is a small program (less than 2 MB), portable and free (free) being developed by KZTechs.COM webmaster, Smallfrogs (has been awarded Microsoft Most Valuable Professional (MVP) for Windows Shell - in China from 2004-2008). The program is intended to detect common problems and system damage commonly caused by computer viruses.
sreng-main
For the expert level (advanced), this program can be used to detect and fix problems themselves. While for ordinary users (laymen), there are Smart Scan function to check the computer and generate reports (reports) that can be stored for further analysis and examined by someone more expert.
Even so, there are various features that can be used directly even though by most computer users. Here's the explanation some of the features and functions that can be utilized.

Boot Items

Displays a list of any programs or applications that automatically run when windows boot, either from the registry (including hidden items, UserInit and others), Folders, Scheduled Tasks, Services and Boot.ini. If you notice any strange programs (suspicious), then we can deactivate aktifkannya remove the check mark by it.
sreng-boot-items
Once removed the check mark, then click the Refresh button, to ensure that the alteration has been saved. If you find that a check mark appears, or re-emerged a new list with other names, is a strong indication that the computer was infected with a virus or other malware (preferably computer / hard drive is scanned either by Bootable CD, portable virus scanner, Or move the hard disk on another computer and scanned from there).

System Repair

sreng-system-repair
In this menu there are several separate functions, such as:
File Association
Displays the status of general files extensions such as. TXT,. EXE,. COM,. PIF,. REG. BAT,. SCR,. CHM,. VBS and others. If the status is not showing "Normal" or we can not run a file with one of these extensions, then we can fix by selecting the problematic file extension and click Repair.
Windows Shell / IE
In this section, we will see lists of windows settings (settings) that are usually modified / damaged by viruses, such as:
  • Menu Start / Run inactive
  • Registry Editor (regedit.exe) could not be opened
  • Command Prompt, wallpapers, Control Panel can not be accessed.
  • Drive not visible in My Computer
  • Log off button does not appear
  • Menu "File" in Windows Explorer does not appear
  • Icon on the desktop does not appear
  • Folder Options can not be activated
  • Search button (search) does not appear
  • Windows Explorer or in the system tray can not right click
  • To show hidden files (hidden files)
  • Various display the menu in Internet Explorer that does not appear
  • various other settings
To fix the above settings, select from the list and click Repair.
Browser Add-Ons
Displays a list of plugins / add-ons (additional features) that runs with a web browser used. We can see the detail information, conceal or remove the add-on is not desirable.
HOSTS File
Hosts file is a list of host names and IP address mapping. For example there are the following lines:
127.0.0.1 localhost
That means when you typing localhost the web browser will be mapped to the IP address 127.0.0.1. For more information see http://support.microsoft.com/?id=108295
This file can be changed by spyware or malware so that when writing a particular web address is actually transferred to the IP address that is not true.
Winsock Provider
Will display a list of Windows Sockets API (Winsock), which handles network access problems, especially TCP / IP.
In this menu there are features "All Reset to default values", which can be exploited if the internet connection can not be run as before (performing) or when a sudden we can not browse, send email or other network operations, whereas a normal internet connection running.
But when the network connection went well and we can browse, send email or do other network operations, not recommended for the Reset. Learn more about Winsock
Advanced Repair
There are two settings in this menu, which is the Recommended Levels and Powerful Fix Fix Level. There are also buttons to Reset Winsock, memperbaki Safe Mode and Performing Scan API Hook (advanced).

Smart Scan

Smart scan will scan the computer to produce detailed reports about the computer system which can then be used by someone more expert to review and resolve computer problems.
sreng-smart-scan

Extensions

SREng supports additional features that can be added separately (you can also make additional / plugins themselves). In Download Page SREng included a few plugins such as:
  • NTFS Streams Scanner, To check the NTFS format of the alarming data
  • Windows Shell Menu Manager, To set menu items such as windows shell menu when right click the desktop and others.
  • Sign Figital File Verify, Identify and verify the digital signature of a file.
  • Network Activity Monitor, To monitor activity / status of the network and provides detailed information about the connection.
sreng-extensions
One thing that may be somewhat less than was lack of help files (manual) who speak English, the language of China and that too is still discussing version 2.5. Apart from that, the program is very useful and can run on operating systems: Windows 98SE, ME, 2000, XP 32bit, Server 2003 32bit, Vista 32bit, Server 2008 32bit.
.
Download System Repair Engineer
Read full story

Thursday 22 April 2010

Changing Easy Ways Twitter Background

0 comments

Good afternoon Tweeps... After we know Engadget twitter history and how to create a twitter account this time will memcoba tips twitter about how to change background twitter. How can the say this is already obsolete for the already expert, but for those who do not know how to change background twitter these tips might be useful:

1.Open account twitter your

2.After that click on the menu Settings


3.Click menu Design


4.Select Change background image


Description:

1.Click Change background image

2.Then Browse.
Here you'll take a picture which we will make the background that we have prepared previous.After it in check Title Background

3.Click save and see the results.
Read full story

Thursday 15 April 2010

Blogging Tips - WordPress Or Blogger?

0 comments
http://www.amitbhawani.com/blog/Images/B/Blogger-Wordpress-Conversion.jpg
WordPress or Blogger? That is the question. Okay, it's no "to be or not to be" but it'll do for the purpose of this article. Lot of people ask me which they should use. Does it matter? Some think that one is better than the other. Well, I figured that I'd give you the straight deal on these two blogging platforms and then let you decide for yourself which is better. I'm going to try to be as objective about this as I can.
Let's start with what I feel is really the most important aspect of these two platforms...and it has nothing to do with the physical aspects of either. Truth is, with Blogger, you're restricted to using it on THEIR domain. In other words, you don't really own the blog. You're just renting space. This can be a problem in two ways.
First, as it's not your site (not really) Blogger can yank it out from under you at any time. So, if they don't like what you're promoting or think you're running a spam blog, you can lose it faster than you can say "Bob's your uncle." Personally, I don't like being at the mercy of somebody when it comes to my blogging platform.
Aside from that, you're limited to the URLs you can choose for your blog. With Blogger, you're on their domain and nothing is going to change that. With WordPress, you can get your own hosting and your own domain and place the blog on it...thus optimizing your domain keywords as much as possible. This is a big advantage of WordPress over Blogger.
But what about functionality? Well, to be honest, you CAN do a lot more with WordPress. The number of plugins are off the charts. However, for a simple blog, Blogger does a more than adequate job. So if you don't want all the hassles of installation and plugin management, Blogger will be fine.
However, the question that people most often ask is this. "Which one ranks better?" This is where you are going to be in for quite a surprise. Truth is, I've seen Blogger blogs that end up as the number one search result over at Google. If you want to be technical about this, it really doesn't matter which one you go with. How well you rank will depend more on the keywords you choose and the niche you're in than the blogging platform itself.
So there you have it...WordPress versus Blogger. Personally, I'll go with WordPress if I want a specific domain and really want to optimize the blog fully. But if I'm putting something together for quick traffic and don't want any expenses, I'll use Blogger.
In other words...it depends on what you're using the blog for.
Read full story

Wednesday 14 April 2010

New WordPress Blogger

0 comments
http://www.walkernews.net/wp-content/uploads/2007/02/new-blogger-vs-wordpress.JPG
Are you a new WordPress blogger and you don't know where to start? I was in your position and I will try to help you as much as I can.
First of all, before you start blogging, I suggest you customize your blog. To do that, considering you are a new blogger, it will take you sometime. While you are customizing your blog, you don't want search engines to crawl it so I advise you first to create a file "robots.txt" and write the following code:
User-agent: *
Disallow: /
Then upload it to the folder containing WordPress (using ftp). That way you will have all the time needed to finish the customization of your blog. When you finish, you remove that file.
Now, you can choose a theme of your choice (in your admin panel, choose appearance -> add new themes). You will be provided with some search options to help you choose the one you like.
After choosing a theme, I suggest you install some plugins (in your admin panel, choose plugins -> add new). Some must have (in my opinion) plugins are:
All in one seo: This plugin has some seo options for your blog.
Google XML sitemaps: It creates a sitemap for you and it automatically notifies Google.
You can also try to search some plugins that you need and experiment. If you plan to use Google AdSense, you can try "AdSense now!". It's a very simple plugin that automatically import ads in your posts.
Now, you can delete the robots.txt file you uploaded earlier and start blogging.
Good luck with your new blog!
Read full story

Tuesday 13 April 2010

How to Block Spam Comments in Your WordPress Blog

0 comments
http://tech.petegraham.co.uk/wp-content/uploads/2007/04/spam.png

How Spammers Reap What You Sow. Is your in-box clogged with junk email messages and blog comments from people you don't know? 86% of all email addresses published on web pages received spam. Spam is something every webmaster and blogger has to deal with. Spam is the unregulated, irrelevant and unsolicited bulk messages filled indiscriminately with links to malicious sites, fake or even banned medicine advertisements.
Spam is one of the most insidious side effects of the Internet revolution and has only gotten worse over time.There are various ways to filter spam in your blog comments.Unfortunately, many of us now spend a lot of time scanning & removing spam that our biggest concern has become that we don't loose original messages we really want. A couple of simple precautions and software available online can dramatically reduce the amount of spam.
How can you stop spam
  1. Use captcha plugins to counter spamming bots, that crawl the internet looking for comment boxes
  2. Use Akismet plugin. Its a free to use service that keeps a database of spamming bots and their activity pattern.
  3. Moderate comments
  4. Disable user registration in WordPress blogs
  5. Dont give away your email addresses. Stop posting your e-mail address on a public forum or website. It is estimated that 95% of all junk e-mail is caused by a person publicly disclosing his or her address in sites like Facebook, orkut etc. Stop email harvesters by obfuscating email addresses. If it is necessary to give one write it in the following manner so that the bots can't catch it. Write info@yoursite.com as info[at]yoursite[dot]com
These few basic things can certainly minimize spam in your WordPress blog.
Read full story

Monday 12 April 2010

Twitter Following Service For Your Business

0 comments
http://usocial.net/blog/wp-content/uploads/2009/09/twitter-business1.jpgTwitter is a social network and microblogging website that allows its members to post and read messages known as tweets. Twitter helps people to communicate and stay connected through the trade of rapid, frequent, 140 character messages or tweets. Tweets are text-based content displayed in the author's account page and brought to the writer's subscribers who're called followers. Twitter's aim is actually to give a service that enables individuals to discover and have content from sources which get your interest as well as to talk about your content material with other people.
On the Twitter Web page "following" somebody means you'll see their tweets (Twitter updates) in your personal timeline. Twitter following service basically means receiving their Twitter updates. Whenever you follow someone, every time they post a brand new message, it will appear on your Twitter home page. New messages are added to your home page when people post them, so that you always receive the tweets instantly. When you log in, you can easily see what the most recent updates are. Twitter offers other ways to follow people too: you can get updates from particular people on your phone!
Twitter enables you to see who you follow as well as who's following you. Followers are people who get other people's Twitter messages. Following is a means to get information, by means of tweets, from a person, company, or organization. Following users is a method to view their updates in your timeline. If you are following anyone on Twitter, this means that you're getting their updates inside your own timeline. Twitter facilitates social networking, but it is not a social networking site. In fact, the way Twitter works is fairly dissimilar from social networks: if you allow friend requests on social networks, it usually means you show up in that person's network and they appear in yours.
Following on Twitter takes a different approach, because rather than indicating a shared relationship, following is really a one-way action which means you would like to get information, in the form of tweets, from another person. Twitter makes it possible for people to have the option of receiving someone's updates without necessitating mutual following.
Twitter following service offers an opportunity to link to one's website, and also the chance to tunnel followers to one's current posts/blogs. Twitter is easy enough for the everyday average Joe to use and relate useless ideas to his or her friends. However when it's used properly, if you're a company owner, you'll be able to stand to make a significant sum of money based on the wittiness or cleverness of the 140 characters that you release there on the web. People who have a very substantial following benefit greatly from such a big following because within your Twitter profile, you may choose to incorporate one URL link back to your website or blog or wherever it is that you might want your Twitter followers to go. Twitter is a real-time information network where you can talk about what's happening with anyone. It's also a great place to create a constant discussion with others who share related interests.
Should you be curious to learn considerably more regarding the twitter marketing service, an up and coming outsourcing industry that can absolutely help quick start your companies and help you save cash, then log on to virtual assistants. You will enjoy it!
Read full story

Sunday 11 April 2010

How to Change Your IP Address

1 comments
http://www.change-ip-proxy.com/images/Change%20IP%20proxy.jpg

The IP or Internet Protocol address helps identifying the terminal that one is using when surfing on the internet while at the same time enabling one to trace their online activities. The Internet Service Providers or ISP controls the IP addresses. Changing an IP address is not something that can be done easily especially if it is done promptly because it takes a lengthy process. However, static IP addresses are assigned by some ISP which when it is needed to change, the ISP has to be contacted for technical support to get a new one. Various computer applications require different procedures to change an IP address.
Through the command prompt
The command based interface is the back end of the computer's operating system. When using the command prompt for changing the IP address, two options are available that can be used.
Option 1
Steps:
1. First, turn on the computer
2. Go to the Start button then Run
3. A small dialogue box will appear on the screen in which 'cmd' is to be typed. This will automatically pull up the command prompt.
4. Type 'ipconfig/release' then press Enter
5. Type 'ipconfig/renew' then press Enter
6. Now type exit to leave the prompt and return to the desktop
When 'ipconfig/renew' is typed, the modem will generate a new IP address.
Option 2
Steps:
1. Turn on the computer.
2. Click Start and Run then type 'cmd'.
3. Now type 'ipconfig/release' on the small box that appears on the screen.
4. Shut down the computer and turn it off.
5. Now, the switches and hubs are to be turned off.
6. Turn off the DSL modem and cable.
7. The computer should be left in that condition overnight.
8. Turn on the cables, hubs and computer.
Through the Local Area Network (LAN)
Here are the simple steps mentioned below can be followed.
Steps:
1. Turn on the computer
2. Press start button on the desktop.
3. Open the control panel and click it to open the control panel screen.
4. Right click on the Network and Connections icon, a small window will pop up.
5. Click on the option reading Properties.
6. Now, Click the box that is besides the Internet Protocol (TCP/IP), then click on properties.
7. A space will appear where the IP address is supposed to be entered. It also has an automatic setting option which will give a new IP address from the router or modem.
For gaining the IP address, a request can be made from the internet service provider.
For changing through Windows Vista
The procedure to change the IP address in Windows Vista is similar to Windows XP. However, the different names are used by Windows Vista application which can sometimes confuse users. The simple steps mentioned below can be followed.
Steps:
1. First, turn on the computer.
2. Press the Start button on the desktop and then open the Control Panel
3. The Network and Internet has to be selected which will automatically open a new screen.
4. Now, select Network and Sharing Center.
5. Select the Manage Network Connections.
6. Right click on the Internet Connections then choose Properties.
7. From the Properties screen click the Network tab.
You can now input the new IP address or alternatively, you can automatically receive it from your router or modem.
Read full story

Saturday 10 April 2010

How to Block Pop Up Ads

0 comments

http://www.fileguru.com/images/b/ip_ad_blocker_network_and_internet_networking-2986.jpegPop up ads are of three different categories namely pop-ups created by spyware and adware, messengers service advertisement and general browser pop-ups. Pop-ups ads occasionally appear on the screen and interfere with the user's ability to view the contents displayed on the screen. The user can easily avoid these advertisements by installing a pop-up blocker.
Messenger service advertisement
These types of pop-ups are applicable only for Windows XP and Windows 2000. They usually occur because someone is accessible to your computer network and is can transmit this message to your computer through TCP and UDP ports. It is the responsibility of the messenger service to transmit these messages. For controlling these pop-ups, the security has to be hardened by installing firewall software like zone alarm or by installing Windows XP which puts off messenger service by default and activates the windows firewall. The port which facilitates the transmission of these messages gets blocked.
For activating firewall in Windows XP, click the Start icon on the desktop, press Run and type the word Firewall.cpl, select the on button lick OK. It is recommended not to connect to the internet before activating the Firewall because there is a risk of computer getting infected.
Pop-ups created by adware and spyware
The function is same as the general browser but spyware is usually run by the browser assistant object which is the activeX controls that connects to the internet explorer and gets in touch with their server without the user knowing it. This can also be a cause of leaking the user's confidential information to the spies as well as wasting the internet bandwidth. In relation with this, any outgoing connection without the user's authorization should be taken as threat to the security of the user. For preventing pop-ups that are generated by adware and spyware, anti-spyware application such as spyware blaster, Ad-Aware, Spybot Search and destroyer should be installed in the computer. They are just the same like the anti-virus software. These applications work by employing the services of the folders of the hosts for preventing unnecessary ads servers and sites that are responsible for conveying these ads, they also increase the security settings of the browser.
Applications like Sygate and Zone Alarm will always signal the user every time when an outgoing traffic is detected. This will enable the user to block Trojans and dialers from reaching the internet. It will also give the user same attentions to the settings of the firewall, it can be assumed as the passage security and operates only with programs that are needed to be assessable to the internet. This point will make the user be able to investigate the performance of the firewall being employed to the websites. They will do a thorough checking of the system for accessible ports and weaknesses, therefore they will accordingly advise the user.
General Guidelines that should be followed
- The system should not be connected to the internet before activating Anti-virus and firewall.
- The security configurations should be amplified in the browser so that the Activex control is blocked from installing automatically.
- The system should be always updated by seeking latest information online or by subscribing to Microsoft Security Bulletin in order to be aware of the possible threat.
- The services of the HOSTS folder should be employed for preventing unwanted websites.
Read full story

Friday 9 April 2010

CD-R For Long-Term Digital Storage of Photos, Audio, and More

0 comments
http://content.etilize.com/Large/10499751.jpg
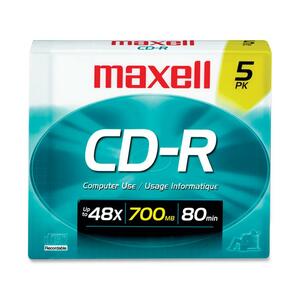
Depending on your storage requirements, a CD-R or recordable CD can be an excellent choice for safeguarding your digital information. Digital files such as digital audio, digital photos that are not very high quality, emails, spreadsheets, and word processing files can all be stored quite well on the CD-R format. However, the capacity of the recordable CD is either 650 MB or 700 MB and because of this, there is not enough space to store significant amounts of digital video and at reasonably good quality. To store more than 15 minutes of digital video on a recordable CD would require heavy compression of the video and this would result in poor quality. Despite this limitation for digital video, the CD-R can be used for the effective storage of most other digital files.
There are various choices for CD-Rs that go beyond just selecting a particular brand. CD-Rs store information in a dye layer and there are three main types of dyes that are used. The three dyes are a phthalocyanine dye which is light green in color, a cyanine dye which is generally light blue in color, and an azo dye which is deep blue. The phthalocyanine dye is the most stable and does not degrade with elevated temperature or relative humidity and does not fade with light exposure. Both the cyanine and azo dyes are much less stable. These dyes are sensitive to degradation initiated by temperature and relative humidity and will fade with enough light exposure.
Another important part of the CD-R is the metal layer. The metal layer is found after the dye layer if looking at a cross-section of a disc from the bottom up. A disc is read through the base. The role of the metal is to reflect the laser light that reads the disc back to the player/reader detector after it reads the information in the dye layer. In order words, the metal layer is very important because it allows the laser light to produce a signal. Without the metal layer, the laser light would shine through the disc and no signal would be registered. There are three types of metal layers that are used in recordable CDs, silver, silver alloy, and gold. Gold is very stable and will not react. Silver will oxidize and corrode and so will silver alloy but to a lesser extent.
Therefore, if you want to store your information on very stable media, the recordable CD or CD-R with a gold metal layer and phthalocyanine dye is the best option. Choosing discs with other dyes and other metal layers can potentially give you much shorter lifetimes. Finally, it is also important to select discs that have a good scratch resistant top layer because this will help prevent irreversible physical damage to that all important metal layer.
Read full story

Thursday 8 April 2010

How to Trace Hackers

0 comments
http://api.ning.com/files/7w-cxeNcXdE6UCRye3sUVdut13mRMCkP2dukc-C*3BrkQPVrryVjNMqtK5lFG0IkWt5ycXMJjBdMHtZJvKW0DuXkx5XdFwPg/hacker.jpg


Ever wondered how hackers function and what you can do to find someone that is hacking into your system. Read through the following article for some answers.
If you want to know how to trace hackers then you will find some answers in the following paragraphs. The first thing that they need, to be able to get into your system is your IP address. One way that can get your IP address is from the header information from emails that you send. Included in header information is the IP address of where the email is being sent from and once they have this they can access you.
Since there are now two kinds of IP addresses, the static and dynamic, hackers are generally able to access people with static IP addresses or using DSL lines. So if you are operating with dynamic IP addresses hackers are of little concern to you.
One way of how to trace hackers is to use a tool referred to as the NETSTAT tool. Using this tool you will be able to see who is connected to you. On your PC go to start, click programs, choose MSDOS prompt and then type in "netstat -a". There must be a between the last t and the a'. The screen will then display a list of active connections. It will show a local address, that is the address of your PC and the ones that they say foreign address are the ones that are connected to you.
There are various NETSTAT commands that will help you understand the workings of your network better. If you want to know how to trace hackers, I recommend that you learn as many of these commands as you can. Once you know them, then you are set.
Read full story

Wednesday 7 April 2010

What 4G Wireless Deployments Mean For America

0 comments
http://images.betanews.com/media/2933.jpg
The United States is a country with a proud tradition of technological innovation and advancement, and it is a country where ordinary people demand access to extraordinary technologies. Though the sheer size of our country sometimes makes it difficult to provide large-scale commercial access to cutting-edge technologies-more difficult, at least, than is the case for smaller countries with smaller populations such as the nations of Europe and Japan - we have nonetheless done an incredible job in this regard, as can be seen, for example, in the case of deployments of latest generation mobile networks. Across the United States there are new deployments of such technology being planned for the imminent future or already being conducted, and more people than ever before are going to be able to enjoy the advantages of super-fast wireless internet than ever before. Yet what are the specific benefits and advantages that the latest in mobile technology, 4G, actually offer America and its citizens? That is a question the answer to which is a little more complex and sophisticated than most people might think at first, and here we'd like to delve a little deeper into the subject to help people out there understand what it really means to have fourth generation wireless networks spreading out across the country.
Though it is still a little ways off, the spread of 4G networks across the land is going to entail an absolutely unprecedented level of coverage, eventually surely stretching from coast to coast. Wireless networks have traditionally focused on the major urban zones of the nation, yet this time around with the latest generation of mobile technology the rural areas of the nation are also going to be brought on board. In fact, providers that have already ventured into remote locations have detected that there is a surprisingly high capacity for acceptable return-on-investment rates in these areas, something which is completely the opposite of what had been originally expected. Though nationwide coverage for 4G networks is still a ways off (that won't last long), residents of places that have already been included in the coverage map will notice that the coverage area they are included is surprisingly vast. Rather than just the downtown area of the cities where such networks are deployed, the coverage area extends well out into the surrounding greater metropolitan area-something that is practically unheard of! The superior transmission capabilities of next generation mobile networks are responsible for this, and it is thanks to the fact that each cell is larger than ever before that bringing the entire country 4G coverage will be feasible in the midterm.
With regards to connection speeds, 4G wireless is going to offer Americans an experience that they will in most cases not even be ready for it's that fast. Currently fourth generation networks are able to bring users speeds that range anywhere from 8 to 15 Mbps, whereas in the very near future such speeds will steadily creep up to 50 Mbps and even beyond. As a result, mobile apps will become much more dynamic and offer capabilities never even heard of before on mobile devices.
See if clear internet hasn't already been deployed in your local area. With the strength of their wimax internet transmitting technology, soon everyone will be able to connect at next-generation speeds!
Read full story

Tuesday 6 April 2010

HP Pavilion Elite HPE-180t Review

0 comments
http://c2.yousaytoo.com/rss_temp_image/pics/0/59/66/125400/medium/remote_image20100103-393-57nsh7-0.jpg
The HP Pavilion Elite HPE-180t is a desktop computer that supports Corei7 quad-core. It also has Turbo Boost Technology, 8 GB of DDR RAM, ATI Radeon HD graphics, and a 640GB hard drive. Obviously, this is a powerful system, and it offers flexibility for expanding and upgrading. If you are thinking about getting this PC, you'll be glad to know that it delivers on everything that it promises. It's powerful, reliable, and even affordable!
While the starting price is $1,079.99, there are some HP Pavilion Elite HPE-180t coupons available that will help bring the cost down. It's a less expensive alternative to some higher end gaming models out there. With this one, you can get everything you need for playing online games, streaming videos, editing digital media, video encoding, photoshopping, and more.
With the Turbo Boost Technology, the performance of this PC is accelerated. If 8 GB of memory isn't enough, you can upgrade all the way up to 24 GB! This desktop computer is designed for high definition movies, gaming, listening to music, and a number of other multimedia functions. There is also room for two large hard drives if you need extra storage. The hard drive space is RAID enabled for data mirroring.
No HP Pavilion Elite HPE-180t review is complete without mention of its appearance. This desktop computer brings a touch of elegance to any room or office. With its center grille design, glossy black finish, chrome and silver accents, and HP logo, this is a very neat looking machine! It also has a landing pad for all your peripherals. You won't have to worry about them sliding around or getting scratched.
If you want to turn this PC into an entertainment hub, you can choose a Blu-ray DVD player and writer. There is also an option to include a TV tuner and video recorder with your order! With clear QAM, you can view select cable shows in high definition! Want to connect a wireless printer, keyboard, or other accessories? You can add the LAN card to your order.
Overall, this is a great desktop computer. As long as you use some HP Pavilion Elite HPE-180t coupons, you can order it at an affordable price online. It's a great option if you want to do a lot of gaming or watch high definition videos. It comes with everything you'll need for multimedia. Running several apps at once is simple with this kind of PC. You can also upgrade and expand if you need a more powerful machine!
This HP Pavilion Elite HPE-180t review highlights its power and reliability. Hopefully, you learned all you need to know about its features and what it offers. Now, you just need to learn about HP Pavilion Elite HPE-180t coupons that will help you save hundreds if you order online!
Read full story

Monday 5 April 2010

Label Cloud (Modification)

0 comments

label Label cloud is a label or category that looks like a cloud. Actually, bloggers are provide labels cloud, but the label cloud from this blogger just by writing just one color. Label cloud that we will modify is how to make the writing colorful large and small as writing.

In this template I have put a label cloud modification, but if you want to place them in another blog, then please follow the tutorial below


Login to Blogger and on the Edit HTML, click the Expand Widget Templates. Then place the following code above the code ]]>< /b:skin>


.label-size-1 a {
font-size: 13px;
text-decoration: none;
color:#4B8A08;
}
.label-size-2 a {
font-size: 15px;
text-decoration: none;
color:#DF0101;
}
.label-size-3 a {
font-size: 16px;font-family: Arial, Trebuchet MS, Verdana;text-decoration: none;
color:#045FB4;
}
.label-size-4 a {
font-size: 18px;
text-decoration: none;
color:#DF0101;
}
.label-size-5 a {
font-size: 23px;
text-decoration: none;
color:#045FB4;
}
.label-size-1 a:hover,
.label-size-2 a:hover,
.label-size-3 a:hover,
.label-size-4 a:hover,
.label-size-5 a:hover {text-decoration:underline}
And then Save Template.
Read full story

Cleaning a CRT and LCD Monitor

1 comments
http://i.ehow.com/images/a04/ku/cl/cleaning-computer-monitors-800X800.jpg


If you are reading this article, then you have a computer and a computer screen. Do you know the tricks to cleaning it? The difference between a Cathode Ray Tube and a Liquid Crystal Display Screen? If not then stay tuned.
The Cathode Ray Tube model or CRT has mostly gone out of style with the addition of Liquid Crystal Display (LCD) and plasma screens. Cathode Ray Tube monitors are those bulky glass covered monitors that take up a sizable amount of room on your desk. Designed for desktops, technological improvements lead to the flat screen monitor which is often a Liquid Crystal Display. Most laptop screens would be a prime example, and the LCD has invaded the desktop computer as well.
The two are obviously different which means that a different method of cleaning is needed for each. The LCD method of cleaning will work for a CRT but the reverse is not true. The glass protection on the CRT means Windex or other glass cleaning products and even tap water can be used. You never want to spray directly on the screen. Instead spray on a cloth or paper towel and use circular motions to clean the screen. Spraying directly on the screen poses the risk of the liquid streaming down and finding a way inside, past the screen.
LCD's are slightly more difficult to clean. They require a microfiber or other clean, soft and nonabrasive cloth. Due to how the liquid crystal displays are made up of pixels, pressing too hard or using abrasive cleaners can lead to permanent damage and a distorted image. Distilled water or approved LCD cleaning kits should be used. When in doubt, follow the manufacturer's instructions. Wet the proper cloth with the right substance and then gently wipe the screen.
Whether a cathode ray tube or a liquid crystal display screen, cleaning is simple and quick if one follows a few simple steps ensuring a clear picture for all your computer needs.
For more information on a clean computer screen and other useful articles visit my profile. I am a free lance writer interested in a variety of topics and articulate what I learn so others can also benefit.
Read full story

Saturday 3 April 2010

Tips For Selecting the Right ADF Scanner For Your Needs

0 comments
http://media.obsessable.com/media/2008/12/17/300/neat-adf-scanner-1.jpg

Due to the vast variety of scanners present on the market, you are bound to be confused about which is the right scanner for you. Most people only require a simple machine to scan and capture information from documents so that they can easily retrieve the data when they need it. It may sound as a simple task but choosing the right scanner for this task can still leave you with doubts. However, there are a few basics which you should bear in mind while browsing for that right ADF scanner.
Firstly, examine your scanner requirements. Ask yourself questions like what kind of data are you going to scan? What are the paper sizes and whether the documents are colored or black and white? You can acquire any ordinary scanner to use at home but for business use, an ADF scanner is highly recommended.
There are three basic features you might want to consider before deciding to buy a scanner. These features are the speed, feed and of course, the price. Scanner speeds are noted by page per minute with which the scanner captures images, however this measure is only applicable in the ADF scanners. Feed is usually the quantity of pages which you plan to scan in the ADF scanner. This is suitable when scanning is required for a large number of pages.
The price factor is the most important and normally is also the determining aspect in the decision making process. You might notice that two similar scanners from different brands may diverge greatly in price. In this case, compare the software installed in the two scanners. A good software option is often worth a bit more money as it will facilitate the scanning process.
If you are looking for a scanner for heavy business load, the average cost of a good scanner will be $ 800 to $1200. If you are planning to scan approximately two thousand documents every day, then a work group scanner will fulfill your requirement. This scanner is compact in size and fast in speed.
The departmental sized scanner for official use, scans up to four thousand documents per day. They are small in size but work much faster than the work group scanner. The best part of using this scanner is that multiple users can be given access to this scanner and hence more work is done in less time. The departmental scanners are usually more expensive, but can be an invaluable member of your work team.
Visit ADF scanner or portable printer scanner for more information
Read full story

Thursday 1 April 2010

Installing a Wireless Bluetooth Speaker

0 comments
http://gizmodo.com/assets/resources/2007/06/samsin_bluetooth.jpg


The word 'Bluetooth' originated in Denmark at the end of the first millennium. The then Danish King, Harald Blatand, united the warring tribes of his land to become the most powerful ruler of Scandinavia. In the same spirit, the object of this new wireless protocol was to unite separate devices harmoniously. The Bluetooth protocol is simple and low cost but global and powerful.
The technology uses radio waves for connecting and exchanging information with other devices. The range is short, around 10 meters and applies to a broad range of devices; cell phones, speakers, MP3 players, cameras, printers etc and expanding rapidly.
Today, almost all laptops, handhelds and mobile phones have built in Bluetooth chips. However, desktop PCs, mostly, do not have Bluetooth incorporated in them. So, to begin with, check whether your PC has Bluetooth capability or not. You will need to buy a Bluetooth adapter (generally priced $10 to $30) for your desktop PC if it doesn't have Bluetooth. The rest of the steps are general and should enable you to start using your Bluetooth speaker within minutes.
Basically, all you have to do is to 'pair' or connect your computer/phone with your Bluetooth speaker.
  • Switch on the computer/cell phone then select or switch on the Bluetooth device on your hardware. The computer will automatically recognize the device and prompt a confirmation.
  • Now, turn on the speaker and press and hold down the Bluetooth button for a few seconds. The Bluetooth light will start flashing and the device will search for other Bluetooth devices in its range to connect to. The computer/cell phone will show a list of available devices usually by their model number. Select your speakers.
  • You will now be asked to input a PIN number or PASSWORD. It is '0000' or '1234' by default for most of the Bluetooth devices (if this does not work, refer to the speakers' user manual or visit the manufacturer's website).
  • Once the password is accepted the pairing is complete. The indicator on your speaker will flash quickly confirming that it is connected. And you can immediately play your audio and enjoy the sound over wireless Bluetooth technology.
The latest Bluetooth technology is Version 3.0 which has a data transfer rate of 24Mbps. Sending sound data over Bluetooth uses considerably more battery than sending data over wires. So along with quality of sound, rate of data transfer and functionalities, battery life must also be taken into consideration when buying a Bluetooth speaker.
Read full story

Building Static WordPress Websites Fast and Easy

0 comments
http://wpsitebuilding.com/wp-content/uploads/wordpress-website-building1.png

First you need to find a nice template that you like. There are many free WordPress template sites. It is very easy to find Go to Google or any favorite search engine and do a search for" Free WordPress Templates" or "Free WordPress Themes".
Static WordPress site rarely need the the blog items like calendars or archives etc. A simple solution is to navigate in your WordPress administration panel to design>widgets. You can then add or subtract the widgets you want and you can make the sidebar look exactly as you like. This way you don't have to touch any code.
Now for the plugins. I recommend these basic plugins.:
Add the all in one seo plugin.
Add the privacy policy plugin. Optional, but I always have a privacy policy on my sites.
Add a sitemap plugin if you want. This is very good for search engines to find all your content.
Add a Google Sitemap and register it at Google. This is very important and will help you do well in Google.
If you want AdSense or affiliate banners add the ads manager plugin or any of the other WordPress plugins available. I like and use ads manager. It is very versatile and it can also can be used to easily add other types of banners to a page and control it by the Admin panel. With ad manager you also need the exec php plugin. This is really important this if you are going to hard code includes into the template. I use it to add banners to the sidebar via widgets and the text widget. If you don't know what this means then you can forget it.
Find the plugins at WordPress.org or do a Google search for each of the above plugins. If I am looking for some type of plugin I usually do a Google search by "keyword" and then "WordPress plugin." I always navigate to the authors site for the latest plugin and instructions on how to use the plugin.
Activate the plugins in your WordPress admin panel. They are located in the plugins link to the right if you are using WordPress 2.5. Again, I recommend that you read the instructions that are on the individual author plugin sites as to how to use each WordPress plugin.
Create a page. Label it whatever you like. Scroll down the page writing panel to the "all in one seo" area and add keywords and description to your page. This is the same as adding the keywords and descriptions to the meta content in the head portion of your template.
Scroll down some more to comments and pings and turn off "Allow Comments" so you won't see a user comment box. I want my site to look like a static site so I don't need commenting. If you want also un-check Allow Pings. It is up to you. I always un-check both.
At the bottom of the page you will see a "page order" area. If you want to have a certain order to your pages in your category menu then name the page you want on top of the menu 1 then the next page you create 2 etc. You can later change the order of your pages by using this feature. This is good so that maybe a sales page will be on top.
I also tend to use the subcategories Parent - child a lot. As an example, I will make a page called "articles" and then add different article pages as a subcategory to articles. I then add some form of introduction to the main article page and have the other articles easily accessible off the main article page. A nice touch for me is that I like to find a template that has a horizontal menu bar with drop down lists. I think it looks very classy. For me everything is then neat and orderly. But this technique is up to you.
In the WordPress admin panel go to settings>reading. On top you will see reading settings. Then "front page displays". In the front page displays check the radio button "A static page (select below)" and then from the front page drop down menu click the page you want to use for your front page. That page I usually title Welcome or I will add a keyword rich title. If you don't want any title leave blank.
With just these little changes you have the start of a static website with WordPress. The key is to use pages instead of posts, add keywords and descriptions via the "all in one seo" and your site is a really nice static website. Remember you can control the way the sidebar looks with widgets.
Do not choose templates that make use of the WordPress tagging feature initially. Some of these templates are called newspaper themes. They are a little harder to do and take a little more to understand. Once you master the basic look then you can branch out and try the tagging features of WordPress.
You can add to this basic formula to make your site even more user-friendly. Again, the above tips will give you a basic static and great looking website.
For more Wordpress tips and tricks and Wordpress tutorials visit the WordPressWebPro.com website.

Read full story

Wednesday 31 March 2010

Joomla Chrome and Template Overrides

0 comments
When you developing a template for a new site you often get stucked, and hit your head against the wall: the code outputted by Joomla sometime severely limits your ability to format the output as you wish. This is true not only for Joomla 1.0.*, but partially for the Joomla 1.5.*. Yes, partially, because you can do things here - and you can do a lot. Searching for a solution for a problem I had run into developing a template for one of my clients I fount this great tip of Jonathan on his blog on http://www.beckettwebdesign.com:
 

While working on a client project recently, I had to delve further than ever before into the templating engine within Joomla, and thought recording some tips may be beneficial both for the community and for myself - because I will most likely forget everything I learned.

The Problem - Overriding Joomla Module Styling

If you have looked at building your own Joomla templates, you may have tripped over this already. Overriding the HTML template for a module (such as mod_newsflash) only replaces the list part of the module. It doesn't replace the "container" - the heading, and surrounding HTML elements.
It turns out the containing HTML, or "wrapper" is called Chrome in Joomla terms, and can be overridden too - although in a different way than normal template overrides.

A Worked Example

First, we will imagine we have our own Joomla template, and that it has a position within it called "latest-news" - the code within the template may look like this:

Normally, we would just make a folder within our template, and make a modified version of the existing component view file. The core file would come from here...
/components/mod_newsflash/tmpl/_item.php
... and put the file (with your changes) in ...
/templates/[template_name]/html/mod_newsflash/_item.php
As discussed earlier though, this only changes the internal contents of the component - not it's title, or surrounding HTML elements.
To do that, we have to make or modify the "modules.php" file in the template html subdirectory. The "modules" file sets out the Chrome used by Joomla to wrap components with. All will become obvious once you see the new function we will write within the modules file.
We make the following text file (if it doesn't already exist)...
/templates/[template_name]/html/modules.php
... and within it, we write the following...
function modChrome_foo($module, &$params, &$attribs)
{
if (!empty ($module->content)) : ?>
showtitle) : ?>

title; ?>

content; ?>
} ?>
The trick here is the name of the function. Notice the "foo" bit? If you change the position in your original template file to have the style "foo" instead of "xhtml" as follows:

... and you suddenly have complete control over the wrapping of modules (through the modules.php file), as well as their content (through the template overrides).

All kudos are going to Jonathan who published the tip on his blog at  http://www.beckettwebdesign.com
Read full story

Monday 29 March 2010

Register Globals-Joom la Tips

0 comments
Many of you probably had seen already the red warning in Joomla's admin interface, that you need to have the Register Globals set to "on", otherwise your site is exposed to security treats.
And also many of you haven't a clue how to do it...
So, let's see what an average webmaster can do about this problem.
Joomla! has always featured the ability to emulate PHP's register globals setting. However, controlling this feature has always been one of the more difficult aspects of configuring your Joomla! installation because it required manually editing a core file.
Namely you needed to edit the globals.php file from the Joomla root and change the line:
define( 'RG_EMULATION', 0 );
to
define( 'RG_EMULATION', 1 );
For Joomla! 1.0.13, all that is history. Joomla!'s register globals emulating controls have been moved into the Global Configuration settings to allow for fast and easy control over this feature. The advantages of this change are two-fold: 1) it will be easier to secure your Joomla! powered website and 2) disabling register globals emulation will help you identify some extensions that will not work in Joomla! 1.5.
But even if you're running earlier versions of Joomla you can avoid to edit a core Joomla file - which is not recommended anyway.
One of the simplest ways to do it is to set server side the corresponding variable to the needed value. This can be set by your webserver's administrator globally or you can set it locally, using local php.ini or .htaccess files, if your server allows that.
The needed line in the php.ini or .htacces file is simple, just insert:
php_flag magic_quotes_gpc on
in a standalone line.
If you're using Plesk, howewer, this may not work. Basically, if you are on a shared server that uses plesk, you will not be able to access the php.ini and generally you're not allowed to use local php.ini files. And, on Plesk by default, magic_quotes_gpc is set to off.
To set magic_quotes_gpc, you will have to edit your vhost.conf. The vhost.conf file will need to be located in the conf directory on your site's ftp. Inside the file you will need the following...

 php_admin_flag magic_quotes_gpc on
 
 
Don't forget to change the path in the Directory directive to your server's actual path to the web directory.
Once this has been placed into the conf directory, run from the command line...
# /usr/local/psa/admin/bin/websrvmng -a -v 
 
Once run, the last thing you will need to do is restart apache.
# service httpd restart
On other servers there may be easier ways to do it. If you're on one of Dreamhost's servers, for example, you have in the hosting control panel the chance to do some of needed settings. If your domain is running PHP4, that has register_globals set "on" by default, and you don't need to do anything.
If from some reason you need to, you can change your domain to use PHP5, which has register_globals turned off. To do this, go to the Hosting Control Panel -> Domains -> Manage Domain screen and click the "edit" link under the "Web Hosting" column. Modify the choice of PHP to use for your domain in the provided "pull down" selector and save the changes. After a few minutes, when the change is complete, you will be running PHP5 with register_globals "off". And you need to fix the situation using some of the above solutions.
Read full story

Saturday 27 March 2010

How To Track Your Advertising Campaigns

0 comments
Often we spend good amount of money on advertising but fail to convert the incoming traffic. One of the reasons is almost nil meaningful traffic analysis that is so vital for any successful advertising campaign. With the advent of new and improved web analytics services there are plenty of options at our disposal, provided we identify and utilize them in a correct way. Let's see how to track and improve our advertising campaigns that can give us maximum returns in limited budgets.

Tracking Advertising Campaigns


Divide - Segregate - Segment


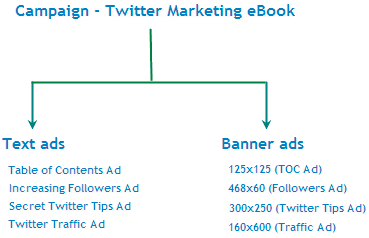
Let's start with old principle of divide and rule. Whether you are tracking text links in email newsletters, regular text link ads, graphic banners ads or video/flash ads, the basic principle to track these ads is to separate each group of ads/campaigns and then associating identifiable and unique metadata to them. Let's assume you are planning to advertise about your new twitter marketing ebook. Let's further assume that you are going to use multiple ad formats with different landing pages for selective ad formats. To make it simple, lets say you have four text link ads and four banner ads (each with unique creative and different size).


Dividing Ads in Groups

At macro level, these ads can be divided into two groups. Each group can be further divided into four sub-groups each one containing ads of different size and different anchor/description text. Once you have completed the classification, you are ready to move on to next level. You can use Google Analytics to track your advertising campaigns. It's a powerful web analytics service that is often undermined by large number of users. It's free, simple to use and provides plethora of options to monitor, analyze and improve your web traffic.


Tag it! - Make Intelligent URL's


As I mentioned earlier, associating metadata with your ad links can help you track and analyze your ad campaigns in an effective manner. This technique is called - URL Tagging. Major PPC advertising networks like Google Adwords inherently supports URL tagging for intense campaign tracking and analysis. For other ad types (direct ads, promotional links), you can use the services of Google Analytics URL Builder to tag your ad links. Tagging a link involves associating variables with it starting with (? question mark) and each variable separated by (& ampersand) mark. For example,


http://www.xyz.com/landingpage.php?variable_1=value&varialble_2=value

Google's URL Builder uses 5 variables for tagging links out of which 3 are mandatory while other 2 are optional.

1. utm_source - As the name implies, this variable identifies the source of ad where it is going to appear. This can be an email newsletter, a feed, a page, a search engine or any other similar source. In simple words, it denotes the referrer. For example: (twitter_newsletter_v1,google,bing)

2. utm_medium - Again the name says it all. The ad medium is identified through this variable. For example: (email,banner,cpcflash,video)

3. utm_term - (optional) Generally, it is used by auto-tagging feature of Google Adwords to assist in better targeting of paid ads. Use this variable to identify paid keywords.

4. utm_content - (optional) Another non-mandatory option used to specify the type of ad associated with any ad link. If you want to differentiate ads on the basis of their types, you can use this variable to classify them. For example: (textlink,bannerlink)

5. utm_campaign - Identifies the campaign name. Use this variable to differentiate between multiple promotional campaigns running simultaneously. For example: (twiiter_ebook, seo_320pack)

So let's get started with tagging of ad links of our fictitious twitter marketing ebook ad campaign.

In first example, we have tagged a text link ad that will appear only on home page of site x. This ad will be served on cpc basis and is associated with twitter ebook promotional campaign.


http://www.xyz.com/ebook.php?utm_source=sitex_home_page&utm_medium=cpc&utm_content=toc_text_link&utm_campaign=twitter_ebook_promo

In second example, we have tagged a URL associated with a banner ad (of size 468x60) that will be served on CPM basis on twitter ebook review page of site y. This ad is also associated with twitter ebook promotional campaign.


http://www.xyz.com/ebook.php?utm_source=sitey_review_page&utm_medium=banner_cpm&utm_content=toc_banner_link_468_60&utm_campaign=twitter_ebook_promo

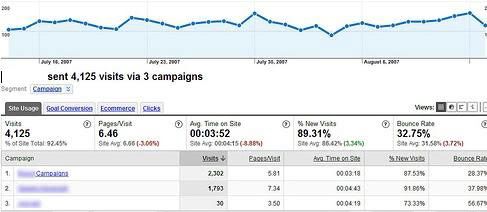
Once you have tagged all the links, you can see the reports in your Google Analytics account via 'Traffic Sources -> Campaigns'. URL tagging not only allows you to track visits from a source, but you can further break it down to specific page and specific placement within that page. Combined with the power of goals, you can take it to the next level to get the actual performance of your advertising campaigns.


Campaigns in Google Analytics


Analyze and Improve


Every successful advertising campaign is supported by analysis of ad performance data and doing improvisations wherever required. Here are some of the common methodologies that are implemented to improve the advertising campaigns.

Identifying performing creatives - Every creative is different and yield different results irrespective of its placement on the web page. Through Google Analytics campaign reports you can easily identify high-performing creatives. Design similar creatives or replace the non-performers with the other ones. Tip: Even if all your creatives are performing well, consider replacing them with the new ones after some time to help reduce ad-blindness.

Identifying best placements - It's almost similar to finding the best combination of your Adsense ads that gives you the best performance. Again, GA campaign reports can easily help you identify best performing spots within a single page.

Identifying performing landing pages - Some landing pages are like honey pots that inherently have very high conversion rates. Identify these high performing landing pages through GA campaign reports and make necessary changes to your ad links to divert the traffic to these pages. Alternatively, you can redesign the non-performing landing pages leaving the ad links intact without any changes.


Over To You


I would like to know your experience about tracking your advertising campaigns. What other techniques and methodologies you adopt to track your ad campaigns?
Read full story

How To Secure Your Wordpress Installation

0 comments
Security has always been a major issue on self-hosted Wordpress blogs. Hackers look for vulnerable web sites whose security can easily be breached to exercise their evil intentions. With every new version, the core engine of Wordpress is getting more and more secure. Still some extra steps are needed to harden its security to the maximum. There's no silver bullet that can guarantee complete protection from hackers, but we can make sure they get a tough time while attempting any intrusion.


Securing Wordpress Installation


There are three sub-systems that needs your attention to secure it from potential threats viz., blogging CMS, back end database and web server. Normally we have complete control on blogging CMS and database, while web server administration is normally maintained by hosting service provider unless you own a VPS (virtual private server) or have your own dedicated server. Remember, your Wordpress installation is only as secure as your web server. If there is any weak link in the server, all the security measures discussed below will go in vain.


Securing Wordpress Directory Tree


The basic strategy to make your installation secure is to restrict public access to sensitive files and directories. Whenever any CMS is installed, the directory tree is assigned certain access permissions that may vary according to the their importance, functionality and usage to help protect them from unauthorized access. Following is the step-by-step method to protect your Wordpress files and directories.

Assigning directory permissions - Start with assigning correct permissions to your Wordpress installation tree. Here are some of the basic rules to follow.

1. No file or directory should have a permission of 777.
2. No file should have a permission of 666, except those theme files that are edited via built-in theme editor through Wordpress dashboard.
3. Ideally, all files should have permission of 644. Similarly, all directories should have permission of 755.
4. Some servers require permission of 'wp-content/uploads' folder to be 777.

Disabling public browsing of directory tree - Add the following code to .htaccess file to prevent any kind of direct browsing activity. This ensures no one can view the contents of directory by simply typing directory paths in their browsers.


Options All -Indexes

Although the same effect can be achieved by placing blank index.html files in every directory, but it is the most inefficient and least preferred method to disable directory browsing.

Securing wp-admin, wp-content, wp-includes and wp-config directories - Apart from disabling direct browsing of directory tree, some extra steps should be taken to restrict access to important directories.

Add the following lines to .htaccess to protect wp-config.php from unauthorized access. As the name implies, this file contains important Wordpress configuration settings needed to connect to your blog's database. It includes MySQL username and password.


<files wp-config.php>
Order deny,allow
deny from all
files>

Adding following lines to .htaccess will protect wp-admin.php from unauthorized access. This will ensure your admin dashboard is protected from intruders.


AuthUserFile /dev/null
AuthGroupFile /dev/null
AuthName "Access Control"
AuthType Basic
<LIMIT GET>
order deny,allow
deny from all
allow from xx.xx.xx.xx
LIMIT>

Here xx.xx.xx.xx are the static IP addresses used by you or other administrators/contributors of the blog. In case you get a dynamic IP address each time you connect to Internet, this method will not work at all. In that case, you can use AskApache Password Protect plugin to protect wp-admin, wp-includes and wp-content without any need to edit .htaccess yourself. This excellent plugin acts as a firewall and adds an extra layer of security protecting your sensitive files from automated spam bots and hackers.


Securing Database


Hackers often target Wordpress database to insert countless spam links within the posts. Whenever you install Wordpress, by default every table gets a prefix of wp_ regardless of the table type. Intruders use this information to launch certain type of SQL injection attacks on the database. For better security, you must change this default prefix to something unpredictable. There are 3 methods to change this prefix.
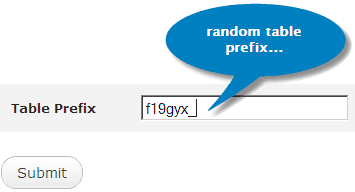
Changing table prefix at the time of installation- This is one of the easiest method to provide a random table prefix to your Wordpress database tables.


Wordpress Database Table Prefix

At the time of installation, you get a chance to edit the table prefix. Choose a random and unpredictable table prefix that cannot be easily guessed.

Changing table prefix manually - This method can be painful for technically challenged. It requires editing of more than one .php files along with execution of multiple SQL queries. However, if you are comfortable with basic blog maintenance (technical) skills, this excellent tutorial shows you how to change table prefix in Wordpress through direct file editing.

Changing table prefix via plugin - Fortunately, Wordpress has large repository of plugins available for almost every requirement. You can also use WordPress Table Prefix Rename Plugin to achieve the same effect.

Regular database backups - Backups are lifesavers in event of any catastrophe that may bring down your entire site. You can use WP-DB-Backup plugin to backup core as well as additional (plugin & 3rd party script tables) tables of your blog's database. Make the habit of taking backups at least once a week followed by saving of more than one copy in two different locations.


Securing User ID's & Login Procedure


Almost every CMS has built-in user access control mechanism that defines a hierarchy of user-types with each type having different set of privileges. Wordpress is no different and supports pretty good user access control mechanism. Hackers target this system to gain complete control of the CMS leaving no chance to recover from the disaster. Here are some methods and safe practices that can help you in strengthening Wordpress access control mechanism.

Delete default administrator account - As soon as Wordpress installation is completed, we get a default administrator account with user id admin and random system generated password. DO NOT use this account for maintaining your blog. Create a second account with administrative privilege and delete the default admin account.

Strengthen login procedure - With the help of these 2 plugins you can make your Wordpress logins more secure and safe. Chap Secure Login encrypts your password to prevent anyone stealing it while it's in transit to the web server. Login LockDown is an excellent plugin that helps prevent brute force attack to guess your passwords. It disables the login function after specified number of failed login attempts within a given time frame blocking an IP range for specified period of time.

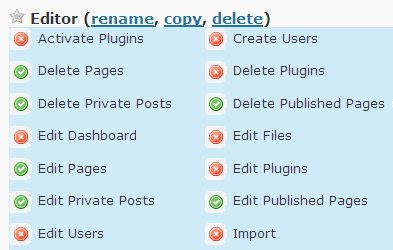
Fine-tuning user access privileges - For multi-author Wordpress blogs,
Role Manager
plugin is a boon. If you want to exercise greater control over user access permissions, this plugin can help you assign specific rights at granular level.


Wordpress Role Manager

Role manager can create custom roles with tailor made access privileges that can be assigned to any Wordpress user on your blog. You can even change and tweak the default roles provided by Wordpress, although it is not recommended and should be avoided.


Miscellaneous Steps To Harden The Security


Hide Wordpress version - Older versions of Wordpress have several loopholes that can be easily breached by seasoned hackers. It is always advised to hide your Wordpress version to mask any vulnerabilities (if any) that may exist in the release you are using. The best way to hide this information is placing the following code in function.php file of your theme.

php remove_action('wp_head', 'wp_generator'); ?>

This ensures removal of Wordpress version information while generating html files for client side.

Keep search engines away from Wordpress folders - You'll never want your blog's entire directory tree to be indexed by search engines. This may expose the contents of sensitive directories making it easy for hackers to analyze and find the potential loopholes. Add the following line to robots.txt file, which is located in the root directory of your blog.


Disallow: /wp-*

Adding this line will ensure none of the search engine bots are allowed to index the directory content.

General Safety Precautions


1. Create strong passwords and change them frequently.
2. Keep your plugins and Wordpress release updated.
3. Regularly backup files and database.
4. Create a disaster recovery plan and simulate it on a test blog.
5. Avoid using plugins from unknown sources (may include malicious code).
6. Use WP Security Scan plugin to find any vulnerabilities in your Wordpress installation.
7. If possible, avoid remote publishing via 3rd party publishing tools.
8. Use SSH or SFTP for secure editing of files and directories.
Read full story
 
Blogging Tips Blogs - BlogCatalog Blog Directory

Followers

Zone Blogger © 2008 Business Ads Ready is Designed by Ipiet Supported by Tadpole's Notez